Monday, 26 May 2008

Venus Transit, June 2004


June 8th, 2004 presented a once-in-several lifetimes opportunity to witness a Venus solar transit. They occur in pairs, 8 years apart, with 122 years between the second of one series and the first of the next. The next one is due on June 5th. 2012, but occurs after sunset in the UK and so won't be visible unless you go to Japan or somewhere like that.

Historically, these events were of tremendous importance, with accurate timings being used to try and calculate the distance of the Earth from the Sun. In his book Venus, (2002, Cassell Illustrated, ISBN 0 304 36281 6) Patrick Moore gives a fascinating account of the various travels and travails that early observers went to to witness these events. These days, they are observed more for fun rather than for any scientific purpose.

For my own part, I fitted my Vixen ED114SS with a Baader solar film filter and used a digital camera held up to the eyepiece to take the various shots shown here. The Baader film gives a white light image and I added a yellow mask in Paint Shop Pro to make them look pretty, but other than rotating or cropping, not much processing was needed to clean up the images I gathered.

The image above is a combination of shots taken roughly every hour, from around 6.30 to 12.15 BST, with the camera held up to a 25mm eyepiece. Two tiny sun-spots can be seen in the centre of the Sun's disc (which made job of the aligning the layers for the composite frame a lot easier!)

The sequences below used a 9mm eyepiece.

The sequence above shows the contact of the western and then eastern limbs of Venus with the eastern limb of the Sun. The two frames just before second contact clearly show the dense Venusian atmosphere lit up from behind by the Sun's glare.

Similarly, the second sequence above shows the contact of the western and then eastern limbs of Venus with the western limb of the Sun. Again, the two frames just after third contact show the Venusian atmosphere lit up from behind by the Sun's glare, although not as clearly as at second contact. By then, a high haze had set in, diminishing visibility.

However, both the weather and the actual timings were kind to observers in my south-east corner of the UK, and I was able to witness the whole event. Observers from other locations weren't so lucky.

Because my eastern horizon is a bit cluttered from where I normally observe, early that morning I took the scope out to a farmer's field in what I thought was the middle of nowhere (after having OK'd it with the farmer first - our local man takes no prisoners if he thinks he's going to be a victim of fly-tippers!). I was nevertheless surprised at the steady stream of ramblers and cyclists who stopped by for a look through the eyepiece, even in my comparatively lonely and remote location. At one point, I had a queue of about six or seven folk, all wanting to see the rare celestial event. Most had heard about it on the news and I was only too pleased to let these passers-by satisfy their curiousity.

You can never be truly alone these days in the busy and crowded south-east, I guess...

Sunday, 25 May 2008

M57 - The Ring Nebula


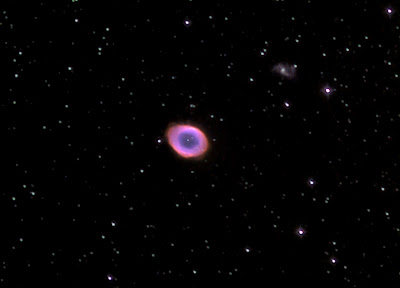
The Ring Nebula in Lyra is another old favourite of astroimagers. The above image (click on the image to emlarge) was taken in September 2007 with the SXV-H9 camera and the Vixen VMC200L (200mm/f9) and was assembled from 20 X 60 second exposures in white light as a luminance frame, with 30 X 60 exposures through a Ha (red channel) filter, with a further 30 X 60 exposures through an O3 (blue channel) filter, all in 2x2 binned mode. The raw frames for each channel were stacked and contrast-adjusted in AIP4Win, then exported as TIFs to Paint Shop Pro, where I used the colour masking technique in "Layers" as described earlier to assemble the final colour image as above.

I had a little difficulty focussing and wasn't too happy with the final star images. After the imaging session, I replaced the CCD with an eyepiece and found that the 'scope was actually rather out of collimation. This was the first time in five years that I had needed to tweak the collimation on the VC200L - it has a double set of push-pull screws to adjust both primary and secondary mirrors, which tend to lock the mirrors in place and keep collimation pretty well. However, I remembered that I had hastily abandoned my last imaging session when a sudden rainstorm had hit, and that I had to remove my rig from its platform and wheel it to shelter pretty quickly when the first big drops of rain started to fall. I guess the hurried lumping and bumping about hadn't done the optics much good.

These compound VC200L scopes aren't the easiest things to collimate, but fortunately there's a good guide here. A few tweaks with an Allen key on the primary mirror adjustors soon got the star images sharp again, and I plan to return to M57 and try to get a better resolved image.

Even so, the image above still shows the 15th magnitude barred spiral galaxy IC1296 to the northwest of M57 - most images you see don't go deep enough to evidence it, especially those taken with digital cameras.

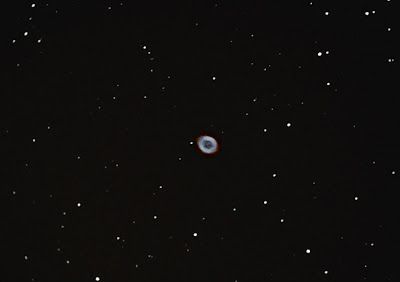
My own earlier (August 2002) effort with a digital camera (afocal projection using the VC200L and a 25mm eyepiece) is shown below (click to enlarge).


This is an average of two 60 second exposures taken at ISO400 and processed in PSP. I haven't adjusted the colours at all, only the contrast and brightness. Whilst the digital camera is noticably less senstive than the SXV-H9 and shows fewer stars, the image itself is still quite satisfying.

Friday, 23 May 2008

M42 - The Great Orion Nebula


M42 is always the first object a budding astroimager most wants to capture, and I was no exception. The shot above was the first and last attempt I ever made at capturing deep sky images with emulsion flim, back in January 2002. It was a 10 minute prime focus exposure on Kodak Gold ISO200 film using an Olympus OM1 mounted on the back of my VMC200L. Maybe some folk out there are capable of accurate manual guiding, but I reckon that the only way to really make film photography work for you at long focal lengths and long exposures is with an autoguider, which I don't have.

When I finally bought a digital camera, this gave me the option of digitally processing much shorter exposures (up 60 seconds) at higher sensitivities (ISO400 or even 800), avoiding to a certain extent the guiding problems. Even so, maybe half of the frames I took in my early sessions still showed signs of trailing. It was then that I learned the importance of polar alignment!

Once I got the hang on my GPDX's alignment scope, then there was the ever-present problem of sky-glow and camera noise to deal with. Five years ago before the advent of low-noise chips, decent internal camera software and CMOS devices, digital cameras were REAL pixel monsters. Here's one frame out of a useable batch of around eight that I acquired from a session in December 2002.


Click on the image (or any other for that matter) for a larger view, that shows the noise and vignetting. The vignetting (the dark corners of the frame) arises from the afocal mounting of the camera, which was fixed to peer down a 25mm eyepiece on my VMC200L by means of a home-made bracket. I never tried making flat frames as the field of view was so wide that I simply cropped out the edges in Paint Shop Pro. Similarly, the noise vanishes with a click of the "Despeckle" option.

Removing the sky-glow and beating down background noise is a bit more challenging. I've reworked many of my old digital camera astro photos with AIP4Win since I've had it, as to be honest, stacking multiple images in PSP7 was a pain and never too successful in my hands. Importing a batch of despeckled frames into AIP4Win brakes the colour images down in to individual LRGB FITs elements, each of which can then easily be stacked to give quite smooth L, R, G and B frames.


The image above is a stack of 7 frames, all disassembled and stacked as individual LRGB frames, and then exported back into PSP as TIFs (I don't think the colour stacking part of AIP4Win v1 is much good, so I use PSP). I merge these the black and white TIFs representing the red, green and blue frames with red, green and blue overlay frames to restore colours and give R,G and B TIFs.

Each colour TIF is loaded into a new frame as a layer (with the luminance one as the bottom layer), which you can then move around to align and then adjust transparencies using the "layers" function in PSP. I guess the colours are subjective - I always think M42 looks slightly greenish through the eyepiece, so I just chose a combination of layer intensities that I thought was the most astheticially pleasing.

With the purchase of a Starlight Xpress SXV-H9, the Orion Nebula was again one of the first objects I wanted to try out. The image below was taken with the SXV-H9 and 4.5 inch refractor, and is an average of 10x15s, 10x30s and 6x60s exposures all at full camera resolution, stacked and processed in AIP4Win.


I wanted to avoid the "burnt out" look you see in a lot of images of M42, where the bright Trapezium area gets overexposed in the attempt to capture the fainter outer nebulosity. Using a stack of shorter exposures in with longer ones has achieved this.

The SXV-H9 is a monochrome device, so if you want colour images you can shoot additional frames through red, green and blue filters, or you can do what I usually do for extended objects like nebulae, and cheat. I have a colour filter wheel, and although you can use 2x2 and even 3x3 binned exposures on your RGB frames to cut down times, I find that using artificial colour masks on monochrome frames gives results that are almost as pleasing in practice.

Below is a monochrome frame blended with a red frame in PSP7. Basically, I make a new file in PSP7 that's the same size as the monochrome, select a nice red colour from the colour pallet, flood fill the new frame and then copy and paste the monochrome one over the top. Using the "Layers > Arrange > Move down" option, I send the monochrome layer to the bottom, and in the layer pallet select "colour" as the blend mode. Somewhere around the 50% blend mark gives you a nice red nebula without red stars.


I then repeated the process for a frame consisting of an average of the 15 second exposures alone, to give a green frame as below:


Blending the two, again using the layer pallet, with the red layer as the bottom one and the green layer as the top and set to "color" in the blend mode, gives you a frame that has the central Trapezium region showing good detail and that hint of green you see visually. Final adjustment in "Curves" to tweak back the RGB and red channel brightness levels gives you a pleasing picture, I think..


Colours in deep sky objects are, of course, largely subjective. Only the very brightest, such as M42, show any colour at all through moderate aperture telescopes, and then that tends to be just green. I'm not a fan of the garish images you see in a lot of the astromony magazines, especially those in "mapped" colour (where Ha is often assigned to the blue channel, making everything look plain weird).

It's all in the eye of the beholder, and often, monochrome images often look the best.

Saturday, 3 May 2008

Saturn occultation, 03 Nov. 2001...


I've always found these events fascinating. The occultation of Saturn by the Moon on 3rd. Nov. 2001 gave me an opportunity to try and image the event. The technique was quite simple - I held my digital camera up the a 9mm eyepiece on my VC200L, pressed the button and hoped! I didn't make a record of the exposure time, but the lunar portion of the image came out OK.

It took a lot of playing in Paint Shop Pro to get Saturn to stand out, it being so much dimmer than the illuminated edge of the Moon. A pale band on Saturn is just visible (click on image to get a bigger view).


On the emergence, the contrast (and thus the image processing required) was a lot less extreme. The Cassini division is just visible in Saturn's rings.

I was quite pleased with the results, even though the imaging technique itself was fairly simple.

Friday, 2 May 2008

Setting Up...

I don't have space for a permanent observatory but if I did, chances are the local chavs would break in and steal or smash stuff up anyway, just because they can.

Setting everything up from scratch for an imaging session is quite time-consuming, and so I built a mobile platform that supports the mount and houses the power supplies for the drive, the CCD camera, the laptop and dew heaters.

The mount and pillar assembly is held onto the top of the box by a stout spring that runs down the tube of the mount pillar and through the top of the platform. This allows some levelling adjustment via the pillar legs but holds the pillar in place firmly enough to stop it moving about during movement of the platform.

The plaform fits on a dolly (see above) that is rolled from my (alarmed) garage to a hard-standing platform at the bottom of my drive, which offers a reasonable south-facing view and which is also fairly well sheltered from street lights and neighbour's security lights. The platform slides off of the dolly and on to the hard-standing area (both are fitted with plastic furniture runners). Once I've got the platform box in place, all I have to do is plug the box into a mains extension, do a polar alignment on the mount and then fit the 'scope, and I'm ready to do my alignments with the "GoTo" Skysensor.

The platform has some locating bars so it goes back in roughly the same place each time, but I use the polar alignment scope in the GPDX to get a reasonable polar alignment that is usually good enough for the 2-3 minute exposures I usually use with the 600mm refractor. I can get away with up to 90 second exposures with the VC200L without noticeable star-trailing if I run the Skysensor PEC, sometimes more if I get lucky with the polar alignment.


The lap-top sits on a roll-out shelf for ease of access (see above)

I do have a guide camera but to be honest I've never found the time to optimise the settings for it. Maybe a job for this summer.

If I get a good three-point alignment, I usually slew to the chosen object for the evening and then ask the Skysensor to find me a nearby brightish star for focussing and accurate alignment. The SXV-H9 software has a nifty little screen that allows you to sample every second for focussing, and I simply adjust the focusser manually until I see the sharpest possible star on the laptop screen. When I've focussed, I use the image on the screen to track the star while I run the PEC programme. I can then use the GoTo function to send the scope to the object. It usually falls on chip first time.

I take a few shots in 3x3 binned mode, with the minimum time needed to show the outline of the obejct in question. That allows me to accurately frame the object before I start acquiring frames for imaging purposes. I run a few long exposures to see how long I can get away with before star trailing sets in, and set the camera to acquire maybe 50 or 60 raw frames. Often as not 2x2 binning provides adequate resolution for most objects, although I'll always go for full resolution if the object is bright enough.

It usually takes about 45 minutes from me deciding to start imaging to actually starting.

My drive is gated and so I usually feel comfortable with leaving the equipment to do its stuff, if I'm not out there actually observing visually with my other scope (I have a CG5 manually operated mount that I use for visual work).

I never bother with dark frames as the SXV-H9 camera doesn't generate much noise - I usually take out the few noisy pixels there are with a median filter during processing. I take flats after I finish imaging - I wheel the whole set-up back into my garage, point the telescope at a large square of white polystyrene sheet fixed on the wall and take 16 flat frames. I also shoot the same number of flat darks. The garage lights seem to light up the sheet pretty evenly and the flats come out with no visible gradients once they are all dark subtracted and averaged.

Thursday, 1 May 2008

Suburban Skies...

The first telescope I ever owned was one I made when I was about ten years old. I pinched the lens out of my Dad's magnifying glass, and the eyepiece out of a toy microscope I had, and mounted them in a cardboard tube. There was a half-Moon that summer evening, and I was so fascinated by the lunar landscape that my Mum had to virtually drag me in to go to bed. I was hooked.

A few years later, the Miner's Strike in 1972 resulted in widespread power cuts, and it was the only time that I can ever recall seeing the Winter Milky Way so clearly, high above Orion, shining in the sky like a glittering, pale silver carpet. Venus, low in the west, was so bright it cast shadows. That Christmas, Mum and Dad had bought me a 10 x 50 pair of binoculars and a Phillips Planisphere, both of which I still have and still use, although my own 10 year old son has come to regard them as his own. I spent many hours that year, scanning the evening sky and learning the constellations.

Then came the world of work, and for over twenty years I neglected the sky above for the more mundane issues related to earning a living. It wasn't until my own son was born that I started looking at the night sky again.

I can't remember what catalysed the decision to buy a "proper" telescope. I do remember getting a good bonus that year, and with my partner's permission, I decided to buy a Vixen VC200L, with a "GoTo" drive unit. What an amazing instrument. I was transported back to my childhood in many ways, only this time I had thousands of deep sky objects to view, often in breathtaking detail.

My first sights of M57, M13, the Orion Nebula and the rings of Saturn showing the Cassini division led me to spend many more hours under the night sky, on some occasions from dusk to dawn. Needless to say, my better half put her foot down about these all-night marathons, especially as at the time I was travelling a fair distance to work every day.

It was only a matter of time before I tried my hand at astrophotography. My first efforts at emulsion photography with the VC200L were pretty awful, but digital cameras were just becoming available for the first time. I finally bought a 3.3MB (which at the time was a "wow") camera, and never touched a film camera again.

My first astrophotograph with a digital camera is above. It was taken in late 2001, I don't have a date. I do remember that I just speculatively pointed the camera at the 25mm eyepiece I had trained on the nearly-full moon, and being astounded at the detail that subsequently emerged on my computer screen.

I've never looked back. For three years I imaged all sorts of objects, simply by mounting the camera on a home-made bracket that clamped on the eyepiece of my VC200L. That camera was capable of 60 second exposures at ISO 400 or 800, although the noise these early cameras generated for such frames was horrendous. Some of the results were quite encouraging however, and I certainly learnt my way around PaintShopPro 7 as the imaging processing software to clean up my noisy, light polluted raw frames.

But when my old digital camera finally died, I finally treated myself to a Starlight Xpress CCD.

This is in a different league, and it's an instrument I'm still learning to get the best out of.